
|
How to take aerial photographsbyJonathan C K Webb BA(Hons), DipM, ARPS |
|
| Licence prices | Main Gallery | Books | Privacy | Terms | FAQ | Copyright | Contact |
The question I am most asked
is how do you shoot aerial photographs, what aircraft or
helicopter should one use and what sort of camera equipment
is suitable for aerial photography.
Which
aircraft to use: The first thing to decide is the
choice of flying machine. Fixed wings aircraft are generally
cheaper and safer but often have struts in the way of the view
out of the window so much coordination with the pilot is
needed to ensure a suitable view. Helicopters are more
expensive but afford a wonderful view with no strut in the way
so you are free to photograph at all angles which is a big
benefit especially if you are not used to taking aerial
photographs. Helicopters are also more stable which is not so
important for daytime stills photography but by night or for
video means that a Heli is de rigueur. Where there is a choice
of helicopters then I always prefer a turbine helicopter as
these are much safer. I'm happiest in a Jet Ranger or MD500
although we have to use a much bigger twin engined helicopter
over big cities. I'm not keen on very small piston engined
helicopters as they do not have such a good safety record. If
money is an issue then a small aeroplane is better. When
working in Germany my most used aircraft is a Cessna 152
aerobat which is very safe and perfect for the job as long as
you keep the wing out of the shot. Unfortunately differing
regulations in the UK mean there are non available to charter
for aerial photography so in many areas you have no choice but
to use a helicopter.
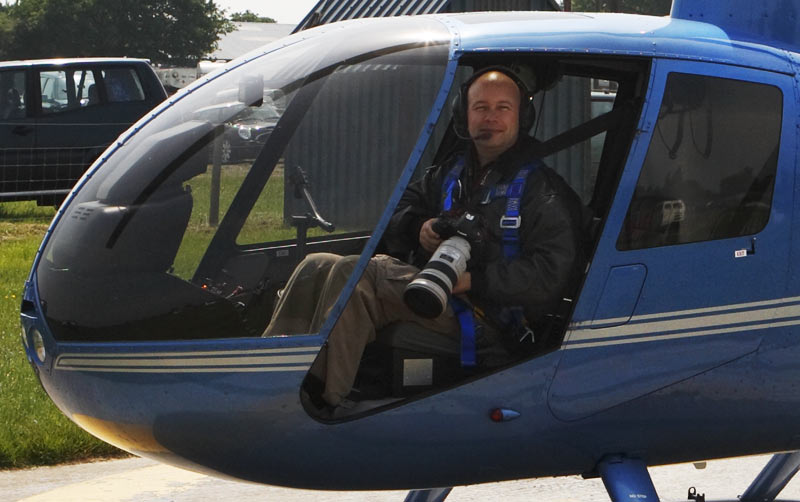
Image courtesy of Thurston
Helicopters, Kent
Safety: The
most important thing is that you and those beneath you
remain safe and for that reason as you can see from the
photos when I am working with the doors off I am
strapped in with both the seat-belt and a safety harness
and also every piece of equipment has a separate lanyard
attaching it to my harness so that nothing can fall out.
( So in the image above the camera has a strap, there is
a lanyard on the lens and also a lanyard on the gyro
stabilizer. The second and third cameras were also all
lanyarded up so when ready for action I often look like
a birds nest sitting in the aircraft! You cannot change
lenses when working with the doors off so I normally
carry 2 or even 3 cameras, each with a different lens.
That`s not shown in the photo as the second camera was
used to take the image! Typically I will have a wide to
mid zoom on one camera and a mid to long zoom on the
other so I have everything covered. If light levels are
low then a zoom lens may not be up to the job in which
case a fast prime lens is the order of the day but you
are limited in how you can shoot. If you fly in enclosed
flying machine then things are much easier as nothing
can fall out and you can use one camera and swap lenses.
I have read on internet forums about people opening the
door of their aircraft in flight particularly in
relation to aircraft such as the C42. This is not a safe
practice and should not be done. Anything which you open
up into the slipstream could separate from the aircraft
and if its something big like a door the next thing it
will do after it has separated is take your tail off and
then your flight will be ended much quicker than
anticipated! If you really must use such a machine then
the safe way would be to remove the doors before flight
but always check with the Pilots Handbook if such
operations are allowed.
Most important for
safety is use an experienced pilot and in fixed wing
aircraft keep your speed up. Many people slow down
to take photographs but this is both necessary and
reduces safety. In a fixed wing aircraft if you fly
slower and slower then you will reach a critical point
where the air is not flowing over the wings enough to
create lift and at this point you are said to have
"stalled" and in effect you are no longer an aeroplane
but half a ton of metal sitting in the sky. Its
best to fly with a large margin of safety over the stall
speed. NB If you are in a stalled aircraft, the recovery
is straight forward but counter intuitive. The pilot
will push the stick forward so the nose is down, that
will cause the airspeed to increase until a point where
the wings start to generate lift and your pilot can then
gently ease the aircraft back into a climb. If you are a
passenger in a stalled aircraft then keep quiet and let
your pilot recover and keep your feet and hands well
away from the controls. Scenes of pilots pulling
back dramatically at the controls are only for the
moves with no basis in real life, pulling back on the
stick would hold the aircraft in the stalled
configuration and cause it to crash, recovery is only
possible by pushing the stick forward and getting the
aircraft in a (gentle) dive. Stall recovery is usually
straight forward and if you are at a sensible height (
you are at a a safe height aren't you? ) it will be done
without too much loss of height. If you have been
unfortunate enough to enter a spin as well then you will
need much more height to recover. That`s why we
fly reasonably high up: the higher you are, the safer
you are, and always keep the speed up. Helicopters are
very different but also benefit from height and speed.
If a helicopters engine fails then theoretically it can
"auto-rotate" which is effectively gliding. However to
auto-rotate the pilot must very quickly reverse the
rotor blade angle. If he is too slow and the rotor blade
slows beyond a certain point then it is irrecoverable.
Height and speed make attaining auto rotation much
easier. Below certain height and speed combinations
auto-rotation is not possible and this is referred to as
"dead mans curve" . Bigger helicopters are also
safer as the rotating blades have greater mass and
momentum which allows for an easier transition into
auto-rotation. Conversely certain tiny two bladed
helicopters have a second or less for the pilot to
detect and react to an engine failure. While this
is possible during practice it is almost impossible when
the engine failure is unexpected and for this reason I
will not fly in very small helicopters at all. Anyway,
all you need to know as a photographer is that whatever
the flying machine, the higher and faster you are, the
safer you are.
What camera
equipment to use for aerial photography: Well
the first thing to say is ignore any Canon vs Nikon
arguments, they both have strengths and weaknesses and
if you carefully identify which one is best this year
then sure as eggs are eggs next year the other one will
be better. Surprisingly also the price of the camera is
not the be all and end all, its the choice of
lenses which will have the biggest impact on your
photography. I can take a really good image using a top
of the range lens on a bottom of the range camera but
not the other way round so if you are on a limited
budget spend most on the lenses and buy the best
you can afford. Prime lenses are much better than
zoom lenses but are much more difficult to use,
especially in the air where effectively the aircraft
becomes the zoom mechanism. I mainly use prime
lenses but I am weird ;o) and few other, if any,
professional aerial photographers do the same. A range
of lenses from 24mm to 200mm will cover most things. I
use my 300 quite often but for many subjects its too
long. I also use 600mm but that's just showing off!

Camera
settings: Speed is the key. If your bouncing
around in a flying machine then to get a sharp image you
are going to need a fast shutter speed. Exactly which
shutter speed is best will vary from camera to camera
and lens to lens but at least 1000th is a good starting
point. I use a gyro stabilizer which holds the whole
camera still and allows a lower shutter speed but most
people will not have anything like that. Beware of
"image stabilization". When using it in the air
sometimes they work and sometimes they make things worse
so you may need to turn it off. Only trial and error
will allow you to find out for sure. I always shoot
aperture priority or shutter priority so cant comment on
the latest automatic "action" settings but would suspect
manual will be better even for beginners. Try TV 1000th
and see how you get on. Remember " do as I say, not as I
do" ;o) I shot this next image at 60th of a second with
a 300mm lens:

Composition: as an aerial photographer you are very much a type of landscape photographer so many of the same rules apply, however as you also need to fly and keep safe many of the tricks of landscape photography are not available to you. Stormy weather looks great on a photographic print but not very great through the window of a light aircraft where you will be more concerned with getting to the safety of an airport as soon as you can. Perhaps unexpectedly fog can be a problem too. It looks great on a photograph seeing sheets of fog with a few buildings sticking through it but just think, if your engine quits, how are you going to land as you will not be able to see a safe field to put down on. I'm a coward so I don't fly in any sort of weather at all. For me a sunny day and clear sky is my preference although the time of day presents a choice. Many stunning landscape images can be taken just after dawn or just before sunset, however if you just want a clear image of a building with not too much intrusive shadow then midday is better. The other thing to bear in mind with shooting late is if your pilot has a night rating and if your destination airfield is still open. Most close at a particular time so flying just before sunset may not be an option. Lighting is everything. This following picture went from good to perfect because the sun angle meant its reflection was exactly symmetrical:

Keeping a good look
out for anything unusual can reap rewards such as this
unusual rock formation which looks like a dinosaur :

but also remember while looking out to keep an eye out for
other aircraft for safety reasons so don't just look at the
ground.
The weather we live for: every
now and then we get a wonderful cloud free day with good
visibility which can make for some stunning photography:

Note the
composition. We don't get many day like that in England so I
like to make sure that I have a bit of blue sky covering about
a third of the image. Cityscapes too can benefit with a little
thoughtful composition:

and remember .... the most important thing to do
while shooting aerial photography is ......
Have
Fun !
| home gallery copyright Privacy Contact / Impressum |